
| Orig. Posting Date | User Name | Edit Date |
| Mar 6, 2016 10:23AM | Hunter2 | |
| Mar 4, 2016 05:17AM | bluebox | |
| Mar 3, 2016 09:14PM | Hunter2 | |
| Mar 2, 2016 07:47PM | Hunter2 | |
| Feb 4, 2016 04:29PM | Hunter2 | |
| Feb 3, 2016 10:13AM | Hunter2 | |
| Feb 3, 2016 10:07AM | swindrum | Edited: Feb 3, 2016 10:08AM |
| Feb 1, 2016 08:42PM | Hunter2 | |
| Feb 1, 2016 12:39PM | swindrum | |
| Jan 28, 2016 02:42PM | Hunter2 | |
| Jan 28, 2016 02:31PM | swindrum | |
| Jan 28, 2016 10:28AM | Hunter2 | |
| Jan 23, 2016 05:44PM | Hunter2 | |
| Jan 23, 2016 10:13AM | Spitz | |
| Jan 23, 2016 08:27AM | Dan Moffet | Edited: Jan 23, 2016 08:32AM |
| Jan 22, 2016 07:53PM | Hunter2 | |
| Jan 22, 2016 07:18PM | swindrum | |
| Jan 22, 2016 06:02PM | Hunter2 | |
| Jan 22, 2016 10:26AM | Hunter2 | Edited: Jan 22, 2016 05:03PM |
| Jan 22, 2016 10:06AM | Dan Moffet |

|
Total posts: 6469
Last post: Sep 29, 2022 Member since:Nov 2, 2006
|
Cars in Garage: 4
Photos: 1354 WorkBench Posts: 2 |
|
|
|
Total posts: 1276
Last post: Nov 26, 2018 Member since:Feb 17, 2005
|
Cars in Garage: 0
Photos: 0 WorkBench Posts: 0 |
|
|
|
Total posts: 6469
Last post: Sep 29, 2022 Member since:Nov 2, 2006
|
Cars in Garage: 4
Photos: 1354 WorkBench Posts: 2 |
|
Will likely be able to assess them and test fit tomorrow.
OK, sacrilege to the purists but the Woody was subject to a cut & shut in New York decades ago. So why not upgrade?
We'll see!
|
|
Total posts: 6469
Last post: Sep 29, 2022 Member since:Nov 2, 2006
|
Cars in Garage: 4
Photos: 1354 WorkBench Posts: 2 |
|
 Sadly my bash & weld partner's Mother-in-Law lasted just 17 days in Hospice and has passed on at 87.
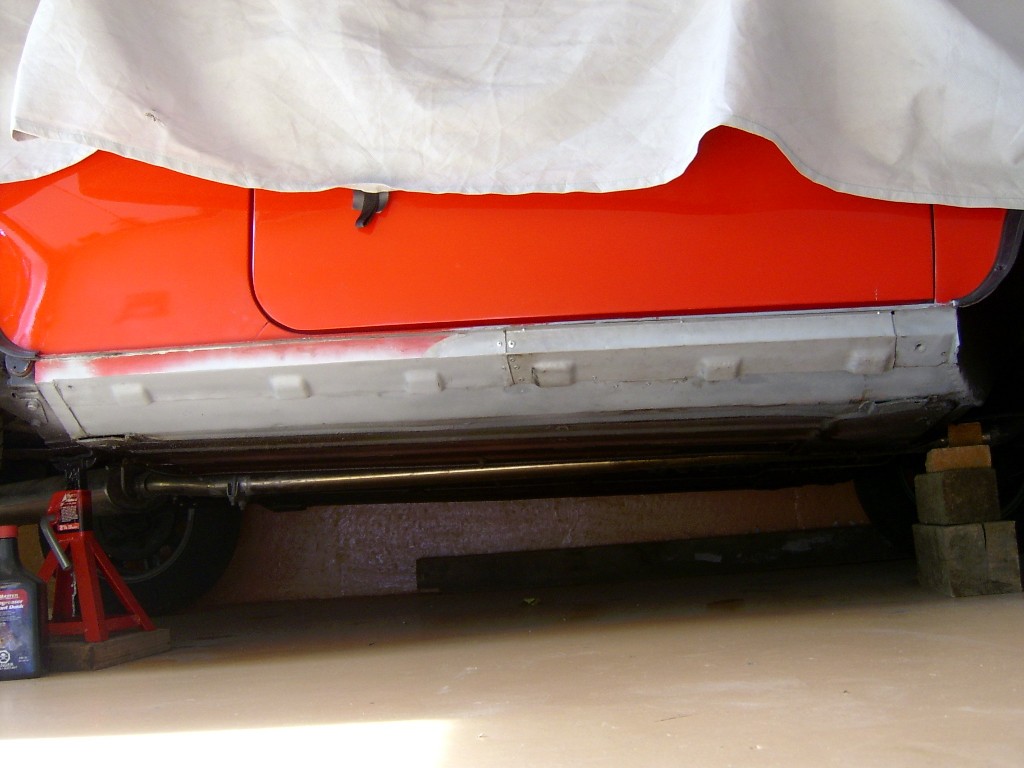
He was keen to get back into the shop after the stress of the past 6 weeks and we had a very good day - fitting the 6 flute outer sill which we converted to a 4 flute sill, final fitting the bonnet (modified to MK I), doing minor welding in the 4 wheel wells/arches, relocating the licence mounting brackets on the early apron.
Now ready to talk body/paint.
|
|
Total posts: 6469
Last post: Sep 29, 2022 Member since:Nov 2, 2006
|
Cars in Garage: 4
Photos: 1354 WorkBench Posts: 2 |
|
Build in a hiatus as my bash & weld partner's elderly Mother-in-Law has gone into Hospice Care.
Nothing more important than family!!
|
|
Total posts: 6469
Last post: Sep 29, 2022 Member since:Nov 2, 2006
|
Cars in Garage: 4
Photos: 1354 WorkBench Posts: 2 |
|
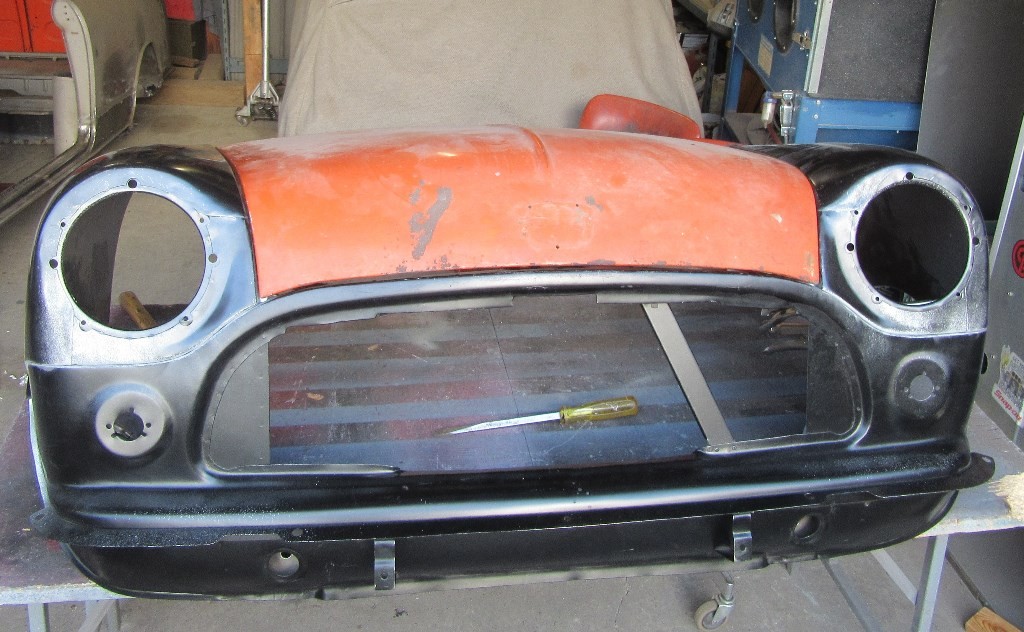
The NEW bonnet is a much better fit just dropping it on. We may massage it, remove the lip and later hinge mounts and replace with the early ones...also weld in an extra bit of steel on the roll down to the lip where cracks first develope in the pressing.
It looks overall that we were about 1/8" off with the 'original' bonnet...HOWEVER before anything is done we will make very careful measurements, then select the bonnet to massage.
|
|
Total posts: 1456
Last post: Jan 31, 2022 Member since:Sep 8, 2003
|
Cars in Garage: 1
Photos: 186 WorkBench Posts: 0 |
|
Where is you bonnet not fitting?
I have found that the curve of the bonnet at the back where it meets the scuttle can be altered quite easily. By bending the flange of the bonnet inward, the bonnet will curve more. If you bend the rear flange closer to 90 degrees the bonnet will curve less.
If the curve of the bonnet where it meets the wings needs to be adjusted, a shrinker/stretcher is an invaluable tool.

Sean Windrum
1996 MGF VVC
1970 1275 GT Racer
66 Austin Countryman
63 997 Cooper (Under Construction)
63 MG 1100
|
|
Total posts: 6469
Last post: Sep 29, 2022 Member since:Nov 2, 2006
|
Cars in Garage: 4
Photos: 1354 WorkBench Posts: 2 |
|
Hi Sean,
Going to deliver a NEW bonnet I have had for years to see if it fits better than the original. Though we worked off original scuttle & inner wings, new wings/apron & bonnet appeared to fit well before spot welding. Original bonnet a bit askew. We'll see.
Rick
|
|
Total posts: 1456
Last post: Jan 31, 2022 Member since:Sep 8, 2003
|
Cars in Garage: 1
Photos: 186 WorkBench Posts: 0 |
|

Rick, jury is still out on the rear 1/4, I have been hammering and dollying and picking and filing and am geting happier with it... Shrinking disc helps too.
Just curious about your wings/bonnet fitment. I have been tweaking the wings/scuttle gap/bonnet gap for over a week now and am happy with the fit now... However, on the passenger side, the wing line sticks up higher than the bonnet and is the wrong curvature. Did you guys encounter this at all? I can lit the bonnet, but then the slam panel gap is huge and all cockeyed. I suspect I need to slit the panel and bring the metal down to match, then re-weld...
Sean Windrum
1996 MGF VVC
1970 1275 GT Racer
66 Austin Countryman
63 997 Cooper (Under Construction)
63 MG 1100
|
|
Total posts: 6469
Last post: Sep 29, 2022 Member since:Nov 2, 2006
|
Cars in Garage: 4
Photos: 1354 WorkBench Posts: 2 |
|
It's coming Sean...message me about the rear quarter. If you come to the Vancouver Mini Club annual brunch on Feb. 21 you could pick it up and maybe win a draw prize! $20 per adult.
Brunch is in South Surrey, reasonably close to Victoria Ferry.
|
|
Total posts: 1456
Last post: Jan 31, 2022 Member since:Sep 8, 2003
|
Cars in Garage: 1
Photos: 186 WorkBench Posts: 0 |
|
Great work Rick!
Sean Windrum
1996 MGF VVC
1970 1275 GT Racer
66 Austin Countryman
63 997 Cooper (Under Construction)
63 MG 1100
|
|
Total posts: 6469
Last post: Sep 29, 2022 Member since:Nov 2, 2006
|
Cars in Garage: 4
Photos: 1354 WorkBench Posts: 2 |
|
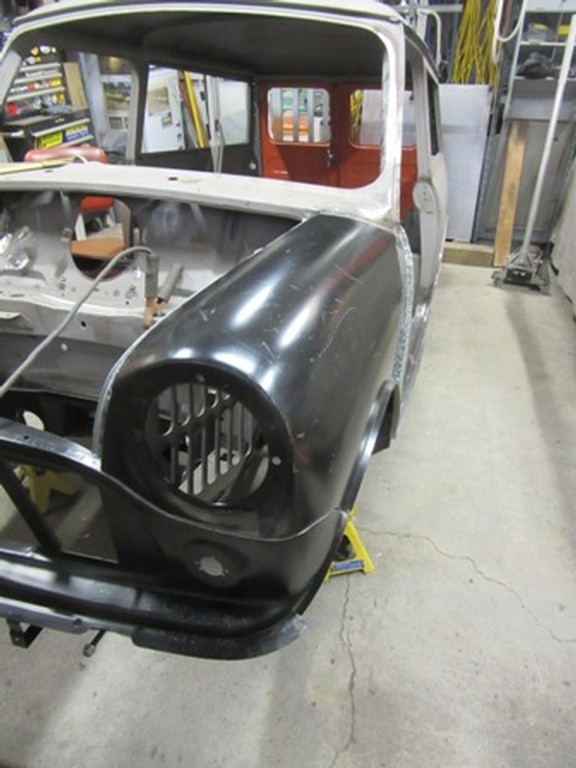
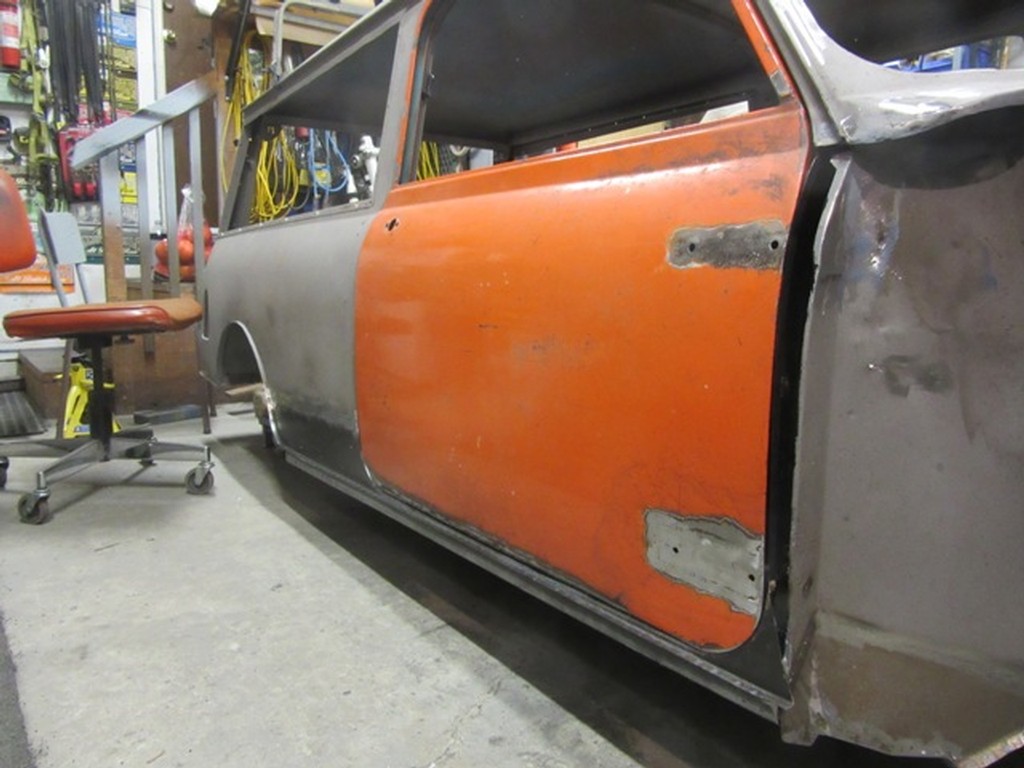
Only the one outer sill to add now that the nose is in place...and some bonnet fitment to address.
Fortunately have new bonnet to use if better fit, but would prefer the 'original' bonnet if possible (it needs some repair too).
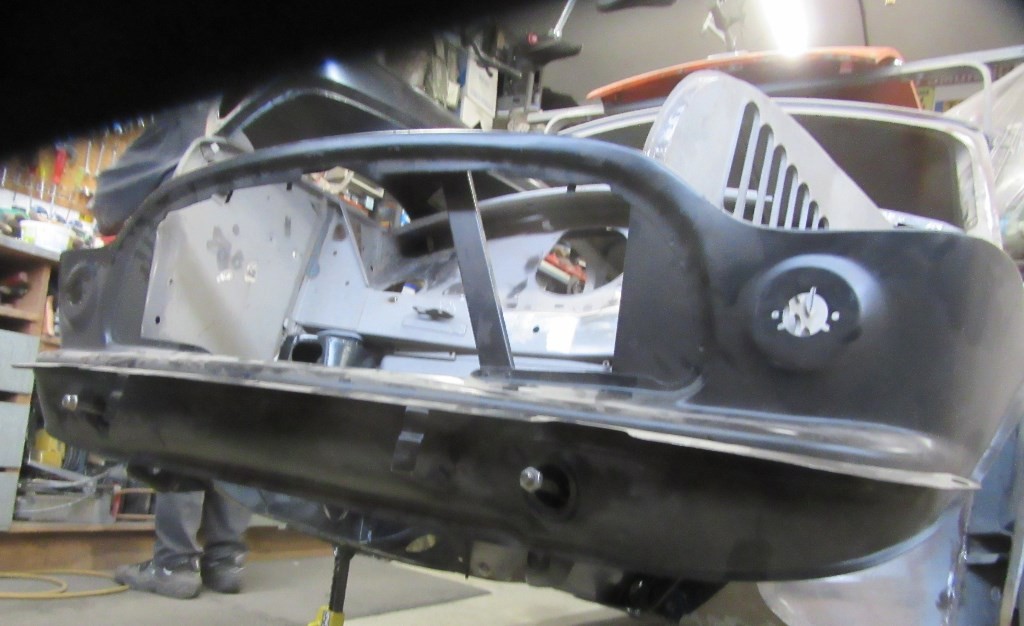
Front subbie was bolted up for 'nose job', which saw the wings on, off, tweak, on, off, tweak until happy and spot welding together.
|
|
Total posts: 6469
Last post: Sep 29, 2022 Member since:Nov 2, 2006
|
Cars in Garage: 4
Photos: 1354 WorkBench Posts: 2 |
|
Hi Spitz,
When the Woody was flat-towed from Sacramento to B.C., it came with a loose Cooper S power unit...I'm guessing the importer thought about creating an S Woody when purchasing steel panels.
The apron/slam panel came that way when I bought the project from the importer.
With a NA 1293 going in, I'll likely organize an auxilary radiator to fit where the oil cooler would have gone...with blanking plate so unshrouded for use in hot weather 90 F & above.
Rick
|
|
Total posts: 13978
Last post: Jan 15, 2024 Member since:Jan 22, 2003
|
Cars in Garage: 4
Photos: 381 WorkBench Posts: 1 |
|
Where did you find that early front apron Rick or did you weld in the corners?
I also notice you're going "S" style...lol...are you fitting an oil cooler?
"Everybody should own a MINI at some point, or you are incomplete as a human being" - James May
"WET COOPER", Partsguy1 (Terry Snell of Penticton BC ) - Could you send the money for the unpaid parts and court fees.
Ordered so by a Judge
|
|
Total posts: 9547
Last post: Apr 26, 2024 Member since:Aug 14, 2002
|
Cars in Garage: 0
Photos: 0 WorkBench Posts: 0 |
|
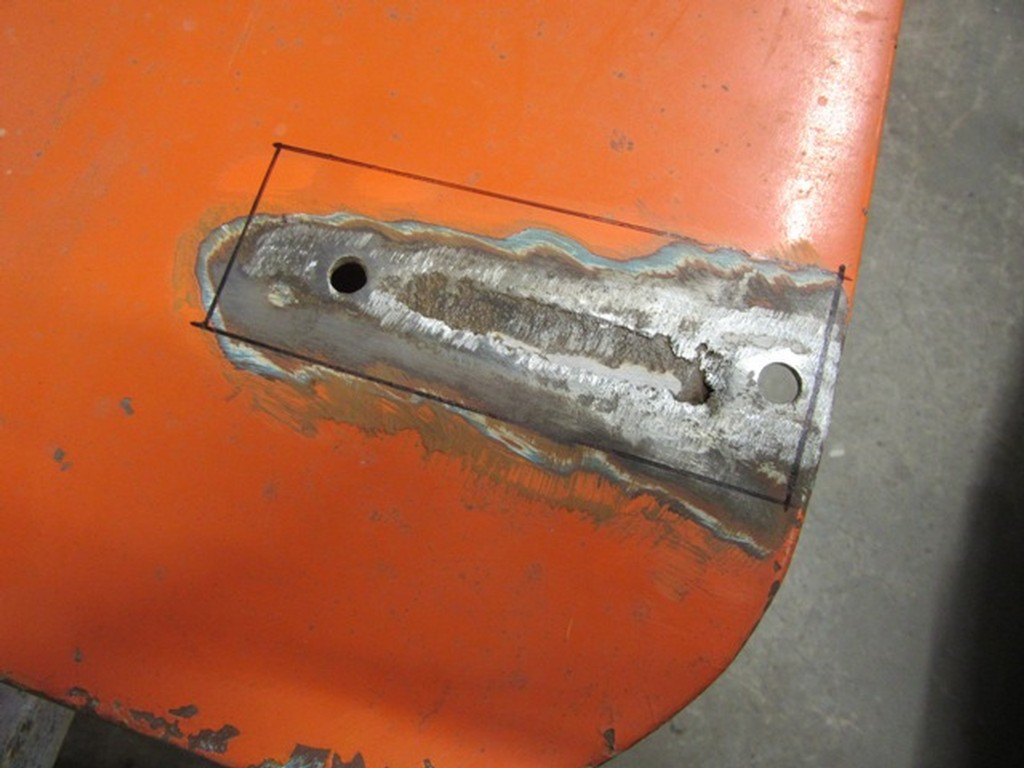
I tried fabricating 1/2 of a Saloon sill by hand. After forming the vents, the piece came out curved. The second time, I cut the vented edge in a slight curve, formed the vents and then made the long bends With a combination of swaged lap joints and backing plates, I positioned it with a few pop-rivets and then took the car to a shop and got them to weld it up. With the panels flush a very small amount of filler to smooth out the joints, once painted it looked original (minus the rust!) I did not replicate the jacking point.
It would have been a lot easier with power shears, presses, welders, stretchers and shrinkers.
.
"Hang on a minute lads....I've got a great idea."
|
|
Total posts: 6469
Last post: Sep 29, 2022 Member since:Nov 2, 2006
|
Cars in Garage: 4
Photos: 1354 WorkBench Posts: 2 |
|
Sean,
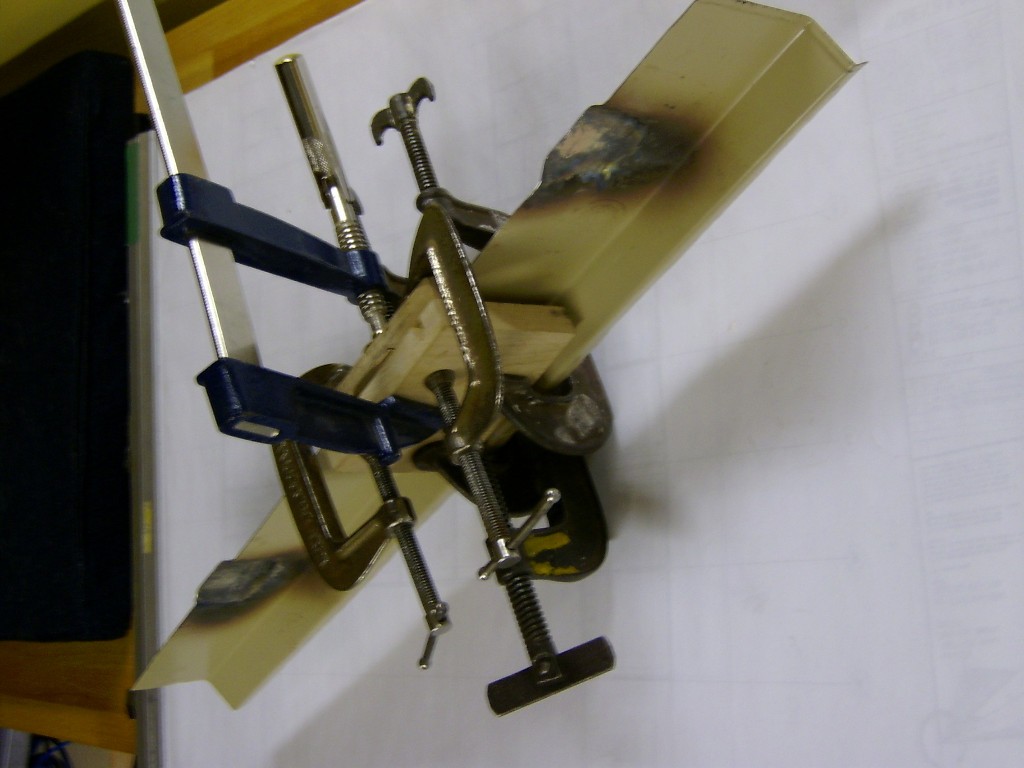
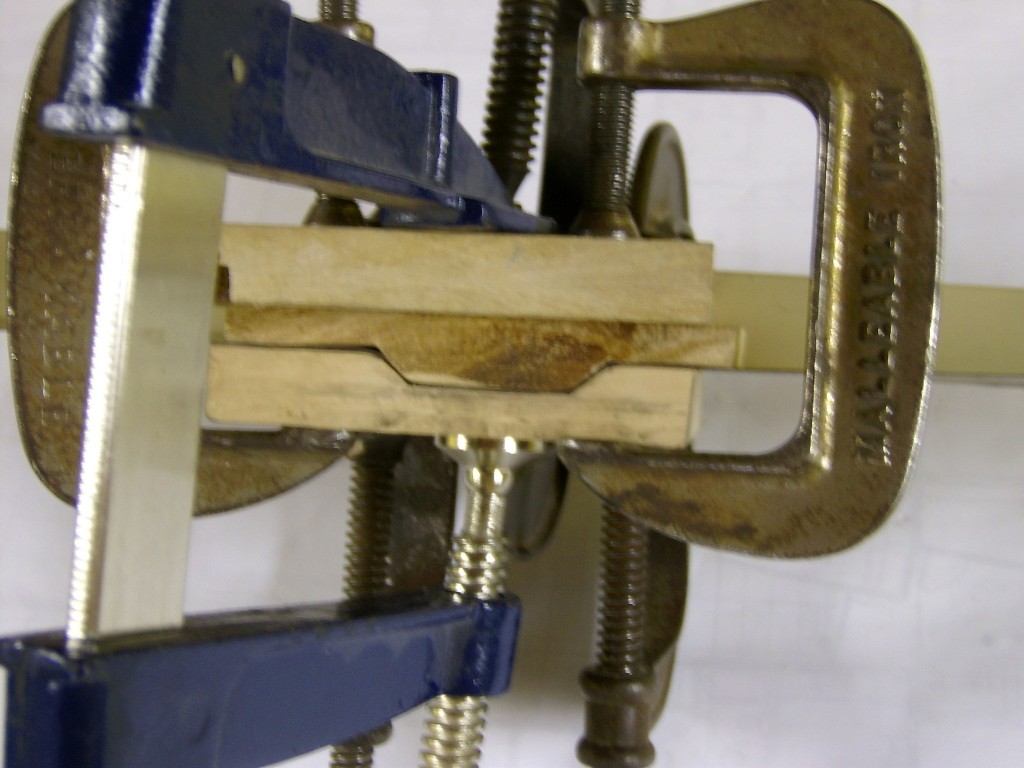
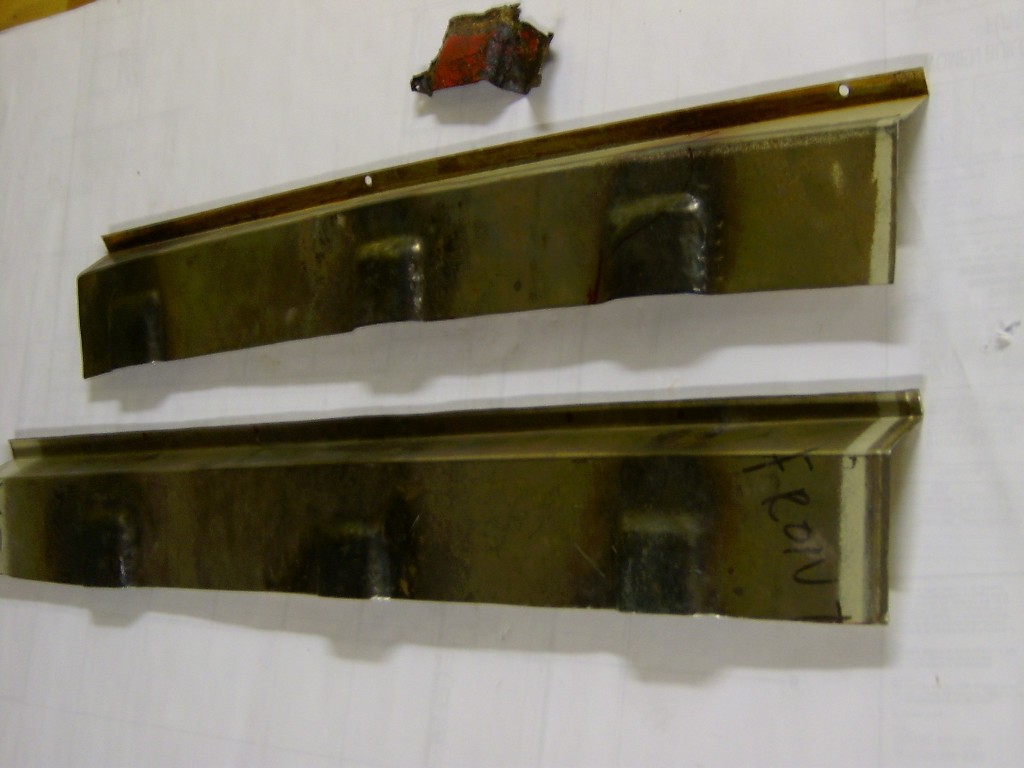
Pounded 6 flutes flat. Then created 4 new flutes (where they should be). Problem, the sill is arced the wrong way.
Fortunately, a friend has two shrinkers - a small one and a big one. Hopefully that will see us out of this situation. Other option cut wedges and weld...but be careful.
Rick
PS - I'm retired. Have been pouring hours into the build...109 so far.
|
|
Total posts: 1456
Last post: Jan 31, 2022 Member since:Sep 8, 2003
|
Cars in Garage: 1
Photos: 186 WorkBench Posts: 0 |
|
Rick, looking amazing! I have been working on the 66 countryman over here too. I am hoping to be where you are on the front clip this weekend, but I havent started on the back yet.
Do you have any photos of how you converted 6 flute sills to 4? I have an idea how I am going o do it, but always good to get more options! ![]()
Sean Windrum
1996 MGF VVC
1970 1275 GT Racer
66 Austin Countryman
63 997 Cooper (Under Construction)
63 MG 1100
|
|
Total posts: 6469
Last post: Sep 29, 2022 Member since:Nov 2, 2006
|
Cars in Garage: 4
Photos: 1354 WorkBench Posts: 2 |
|
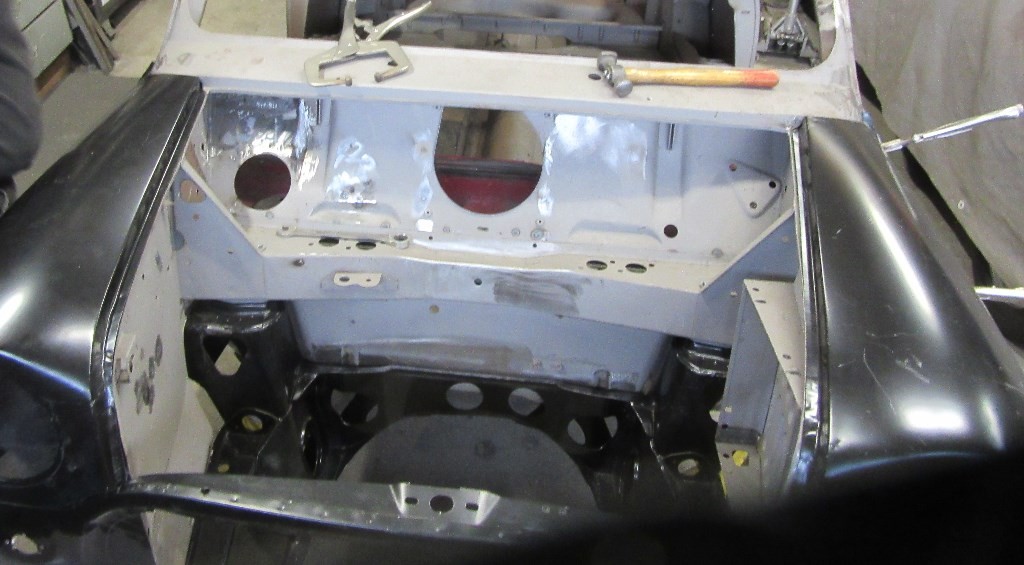
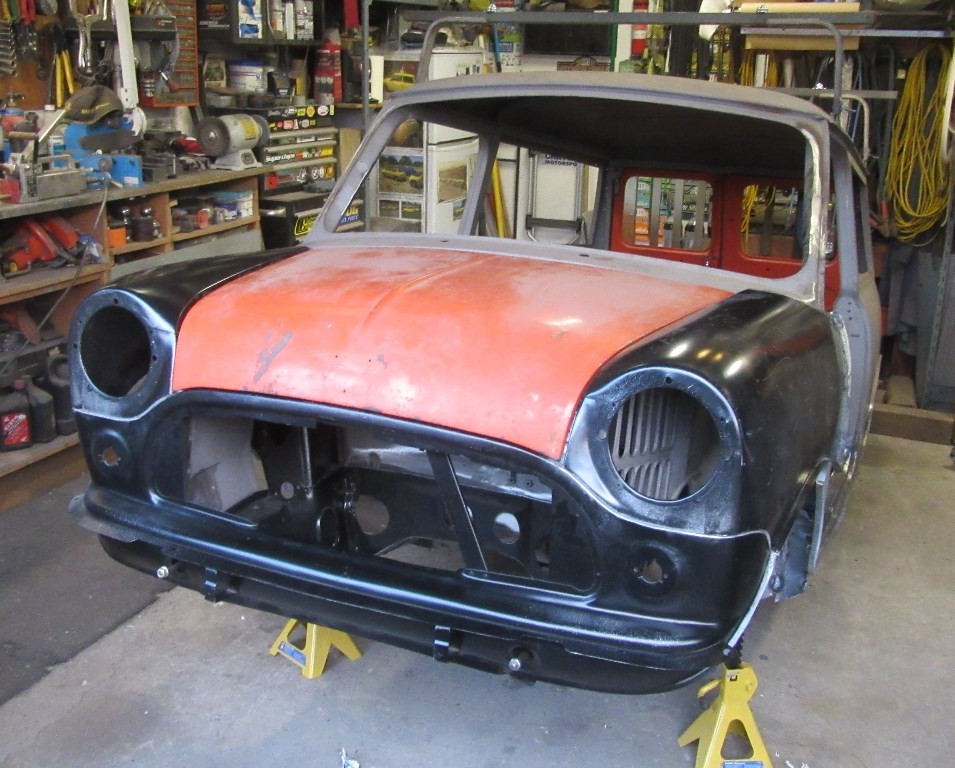
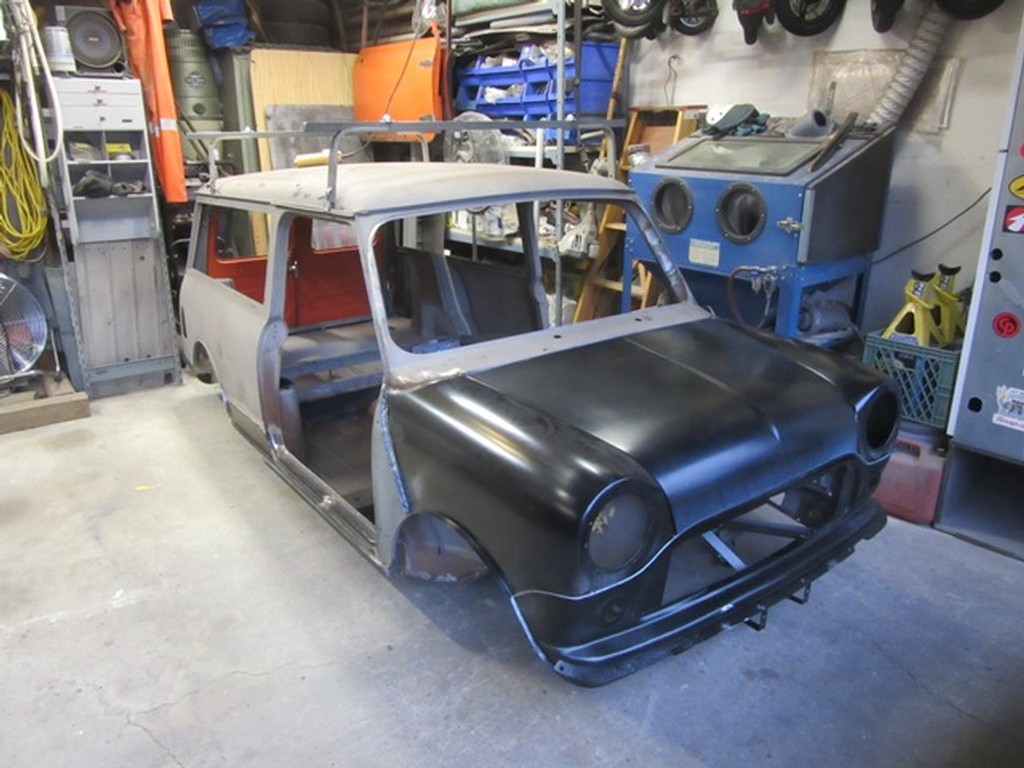
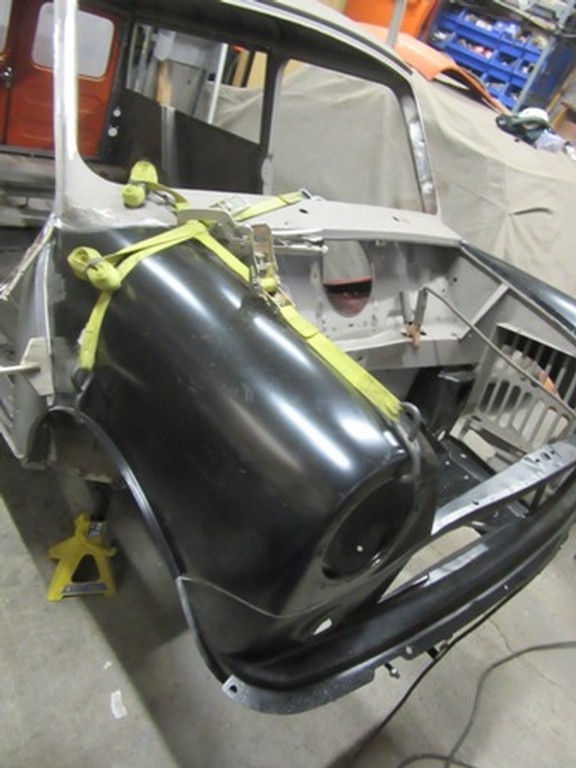
Only 4 hours on the build today...but, we have the clip together.
With family about on the weekend, we'll get back to the build on Monday hopefully (my partner has an older family member's health issues looming large).
Start with bolting the subframe in place, bolt new apron in place, clamp wings to apron, inner wings, A panels....take off, tweak, reinstall, remove, tweak etc. etc. until happy...then weld up.
|
|
Total posts: 6469
Last post: Sep 29, 2022 Member since:Nov 2, 2006
|
Cars in Garage: 4
Photos: 1354 WorkBench Posts: 2 |
|
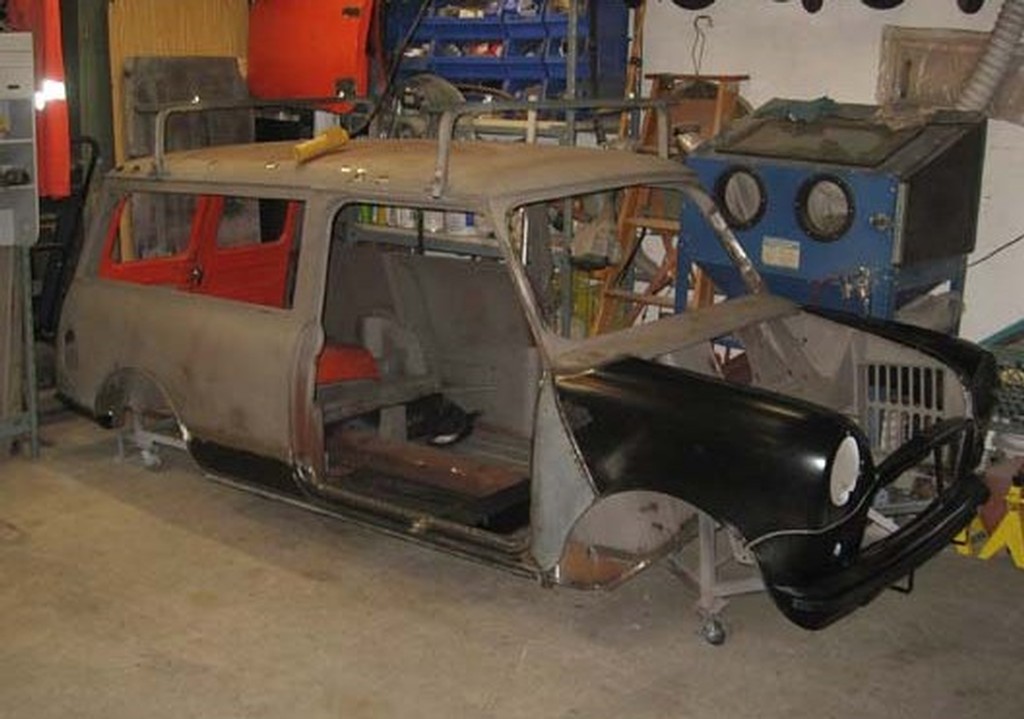
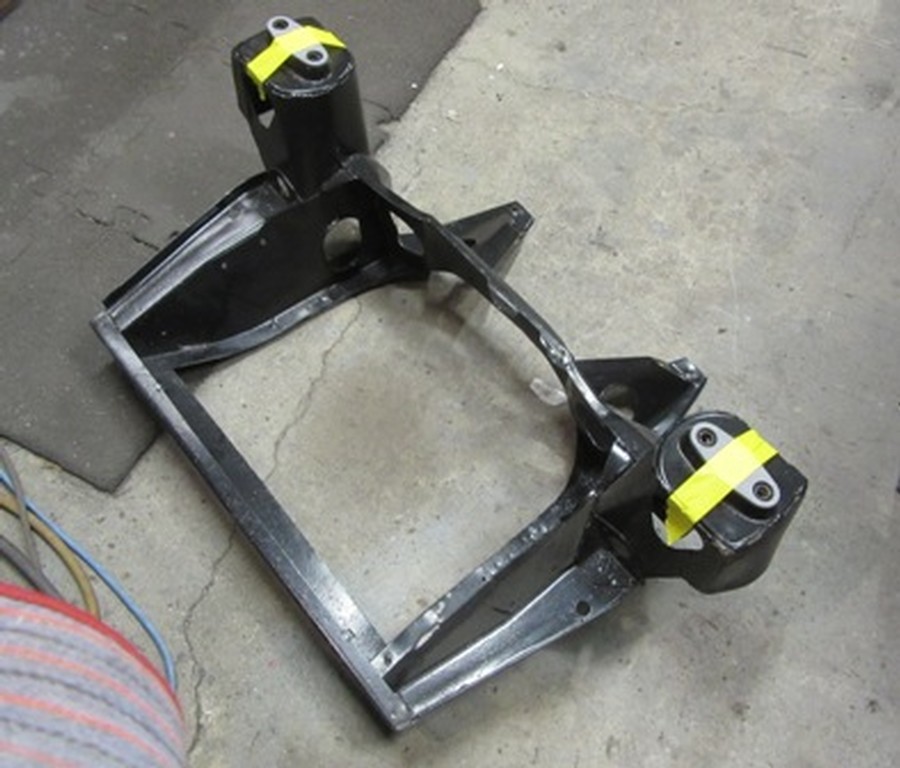
Dan, did you also notice the much smaller ball rollers on the rack? The big ones were worn out and only the small ones were available....
LUCKY will roll on 10" wheels...maybe Minilite 4.5" S offset wheels...to keep the rubber under the body.
Will be awhile before the built front subbie goes in. Bare subbie in today at Noon (when we start) on the wings/apron/bonnet fitment.
(Alex had encouraged me to use 10s versus 12s and with NA 1293 the S discs will be fine)
|
|
Total posts: 9547
Last post: Apr 26, 2024 Member since:Aug 14, 2002
|
Cars in Garage: 0
Photos: 0 WorkBench Posts: 0 |
|
Nice work, though I think the front wheels are a tad on the small size.
.
"Hang on a minute lads....I've got a great idea."


